Shrinkage hole is a common internal defect of aluminum alloy die casting, often appearing in the product wall thickness is large or easy to form hot spot position. Generally speaking, as long as the shrinkage holes do not affect the use of product performance, are determined in a qualified manner. However, for some important parts, such as automobile engine cylinder block cooling waterway holes or lubricating oilway holes, shrinkage is not allowed to determine qualified.
One of our company’s engine crankcases made of aluminum alloy is cast in Bühler’s 28 000kN cold chamber die casting machine, made of ADC12 alloy. The gross mass of the casting was 6.3 kg, and when X-ray flaw detection was carried out in the post-process, it was found that there was a shrinkage hole in the oil passage of the second crankshaft bearing hole, which was about 8 mm away from the oil passage, and there was a large risk of oil leakage. According to statistics, the scrapping rate of shrinkage holes in this position was 5% in 2017, and after a series of exploration, the scrapping rate was successfully reduced to 0.2%.
Aluminum alloy die casting shrinkage hole formation mechanism and morphology
Shrinkage formation mechanism
Lead to aluminum alloy die casting shrinkage of more reasons, trace its origin, mainly from the liquid phase of aluminum alloy to the solid phase transition process of aluminum liquid shrinkage caused by insufficient. Common reasons for shrinkage are:
① Mold temperature gradient is unreasonable, resulting in inconsistent local contraction of liquid aluminum.
② liquid aluminum pouring volume is small, resulting in thin cake, insufficient pressurization stage of pressurization.
③There are hot knots or sharp areas in the mold.
④ The inner gate of the mold is not wide enough and the area is small, which leads to premature solidification of the casting, and the pressure transfer is blocked in the boosting stage, and the aluminum liquid cannot make up the shrinkage.
⑤ The casting pressure is set too low, and the effect of shrinkage is poor.
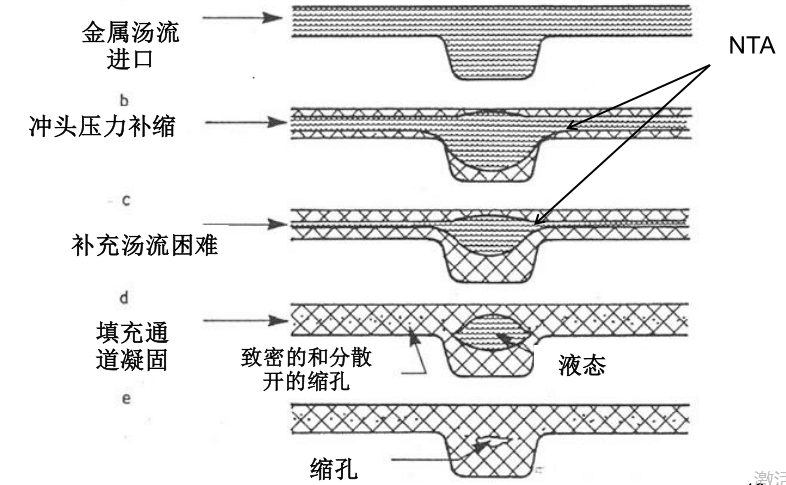
Shrinkage hole pattern of casting
Shrinkage hole is a kind of aluminum alloy die casting and even casting common internal defects, often appear in the product wall thickness is large, mold sharp corners and mold temperature temperature difference is large and other areas. Figure 2 for a certain engine crankcase shrinkage hole pattern, shrinkage hole is like an ellipse, about 10 mm from the bearing oil hole, the inner wall is rough, no luster. Shrinkage hole area casting wall thickness is larger, about 22 mm; oilway hole pin front without cooling water, mold temperature is higher. The two main journals of the crankshaft of the automobile engine (main journal and connecting rod journal) have a large working load and serious wear, and must be pressure lubricated during work. In this case, the presence of shrinkage holes near the oilway holes of the journals will seriously affect the lubrication effect.
Shrinkage hole related countermeasures
Aluminum alloy die casting casting defects are caused by the product’s own structural characteristics, mold design pouring system and cooling system design is unreasonable, process parameters are not designed reason. According to the common reasons for casting defects and aluminum alloy casting defects treatment process, to explore the solution of aluminum alloy die casting thick parts of shrinkage hole corresponding countermeasures.
Pre-analysis and countermeasures
Pre-analysis of casting shrinkage from the easy to operate process parameters, through on-site measurement and observation, measured the mold gate thickness of 4 mm, the calculated inner gate speed of 40 m/s, the product wall thickness of the thinnest place for the 4.6 mm; cake thickness of 25 mm; casting pressure of 60 MPa. From experience, mold design in line with the structural characteristics of the product, the mold casting system should not have a pressurization stage to make up the shrinkage of insufficient problems. However, the aluminum liquid in the pressurization stage is not enough to make up the shrinkage. However, the shrinkage of aluminum liquid in the boosting stage is directly related to the thickness of the cake and the boosting pressure, and the appropriate thickness of the cake and the casting pressure can form the casting with dense internal organization. Therefore, it can be suspected that the shrinkage holes are caused by the casting pressure is low and the cake is thin.
The countermeasures to eliminate shrinkage in castings in the first stage are divided into two:
- Increase the casting pressure from 65MPa to 90MPa;
- The thickness of the cake is adjusted from 25 mm to 30 mm. After the adoption of the above measures, the shrinkage rate is reduced from 5% to 4.8% after the verification of small batch special flow, the effect is not obvious, which indicates that the process parameters are not the main cause of shrinkage of the castings.
Mid-term analysis and countermeasures
Since the essential cause of casting shrinkage is the insufficient shrinkage of aluminum solidification, and the uneven distribution of mold temperature can easily lead to the unreasonable order of aluminum solidification, thus insufficient shrinkage, therefore, the medium-term countermeasures analysis mainly starts from ensuring a reasonable mold temperature. From the 3D model of the product, it can be seen that the wall thickness at the shrinkage hole of the casting is 22.6mm, and the wall thickness is larger, which is easy to cause a higher mold temperature. When the aluminum liquid solidifies, the aluminum liquid inside the casting with large wall thickness is still in the liquid phase or solid-liquid mixed phase due to the high temperature, while the channel for making up the shrinkage in the inner gate may have already solidified at this time. As a result, the casting is not able to make up for the aluminum liquid during the pressurization phase, which may lead to the formation of shrinkage holes. In order to ensure the appropriate mold temperature, the thermal imaging camera was used to measure the maximum temperature of the mold after the mold release agent spraying was 272 ℃, which was higher than the normal temperature of the mold after spraying, and the temperature of the mold and its distribution was normal in other areas. Therefore, it is necessary to reduce the mold temperature at the shrinkage hole. In addition, it was measured that the distance between the bottom of the cooling water hole and the surface of the mold cavity is 20 mm, because a larger heat transfer distance will reduce the cooling effect of the mold, so the cooling water hole needs to be changed.
In order to reduce the temperature of the mold at the shrinkage hole, three main methods are adopted:
- Improve the mold cooling system. Shrinkage holes attached to the depth of the cooling water hole deepened from the mold surface 20 mm into 12 mm, in order to quickly take away the heat of the mold near the mold, reduce the mold temperature; all the mold cooling water pipe and the water pipe unified number, one by one correspondence, to prevent the mold preservation of the wrong fashion, affecting the cooling effect.
- Reduce the pouring temperature, from 675 ℃ to 645 ℃.
- extend the shrinkage hole at the mold spraying time, from 2 s into 3 s. After the implementation of the above corrective measures, shrinkage hole area mold spraying temperature is greatly reduced, about 200 ℃, belongs to the normal range. Shrinkage rate of 4.8% to 4%, indicating that such measures have a certain effect on shrinkage, but can not completely solve the problem of shrinkage in this area!
Post-analysis and countermeasures
Through the previous two improvements, basically ensure that the die-casting mold is in a theoretically reasonable state, that is, the pouring system design is reasonable, the cooling system arrangement is appropriate, and the process parameters are designed optimally. However, the rate of casting shrinkage is still as much as 4%. Castings shrinkage hole at the wall thickness of 22.6 mm, much larger than other parts of the wall thickness, a larger wall thickness may cause the casting center solidification of complementary shrinkage is insufficient, after the end of the pressurization of the region has not been completely solidified, and continue to contraction of shrinkage holes. Therefore, how to solve the casting shrinkage holes in the shrinkage of the complementary shrinkage, may be the key to the problem. Generally speaking, the casting shrinkage through the cake → sprue → gate → casting path. Due to the casting of thick parts after the solidification of the inner gate, cut off the pressurization of the late make-up shrinkage channel, so can not make up for the shrinkage.
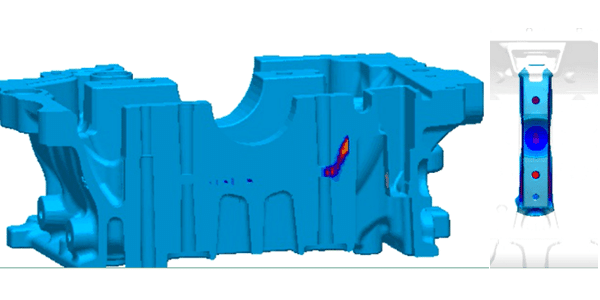
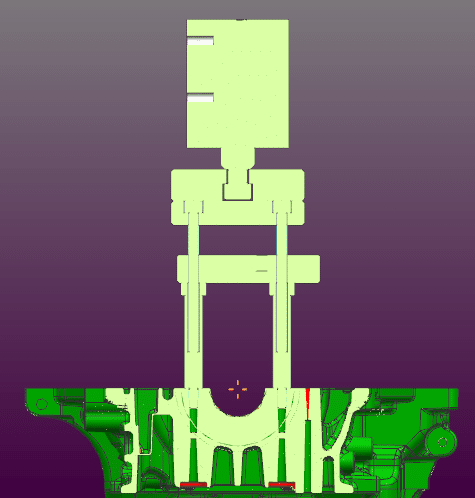
In view of the conventional pressurization stage of the injection punch through the cake to exert casting pressure to achieve the role of shrinkage, the measures taken are in the casting shrinkage hole near the increase of a similar slag packet structure to act as a cake, the use of a pair of cylinders pumping mechanism as a punch, in the casting solidification late in the region prone to shrinkage holes in the second pressurization shrinkage to eliminate the shrinkage hole purpose. Generally speaking, this secondary pressurization mechanism is called extrusion pin, it is the principle of pressurization in the metal or alloy liquid pouring to completely solidify before applying appropriate pressure to strengthen the casting solidification shrinkage effect, to improve the casting density, reduce or eliminate the purpose of shrinkage holes. Pressurized solidification can change the metal and its alloy physical parameters and crystallization process, change the distribution and size of the loose cavity, improve the casting density, improve the casting tensile strength and hardness and other properties.
According to the casting shrinkage, pressurization law, extrusion pin action signal using the casting process of the pressurization signal, and based on the delay as the start signal, therefore, the extrusion pin is mainly to control the extrusion depth and extrusion delay time two parameters. Extrusion depth according to the casting structure and shrinkage hole distribution, size, generally 10 ~ 20 mm; extrusion delay time is mainly set with reference to the pressurization time, generally 2 ~ 5 s. In the actual project, the extrusion parameters are determined on the basis of the empirical value of the casting according to the optimization of the situation. In order to facilitate the adjustment of extrusion parameters, a separate cylinder is usually used to control the extrusion pin action.
For crankcase castings, the later improvement measures are to symmetrically arrange two extrusion pins near the bearing holes of the mold. As shown in the figure below, by adjusting the two main parameters of extrusion depth and extrusion delay, the effect of the secondary pressurization of the extrusion pins is optimized to reduce the rate of casting shrinkage. On the basis of the aforementioned measures, the shrinkage rate of the mold after the addition of two extrusion pins decreased significantly, and the defective rate was reduced from 4% to 0.2%. At the same time, in the 0.2% of shrinkage defective products, the size of the shrinkage hole is significantly reduced. Therefore, the squeeze pin program plays a better role in controlling the shrinkage rate of castings with increased wall thickness. However, in this improvement process, the casting shrinkage defective rate also had fluctuation phenomenon, through the optimization of the extrusion parameters extrusion depth of 15 mm, extrusion delay time of 2.5 s and the provisions of the extrusion pin service life (times/8000 die) and other related specifications, so that the casting defective rate stabilized in the vicinity of 0.2%.
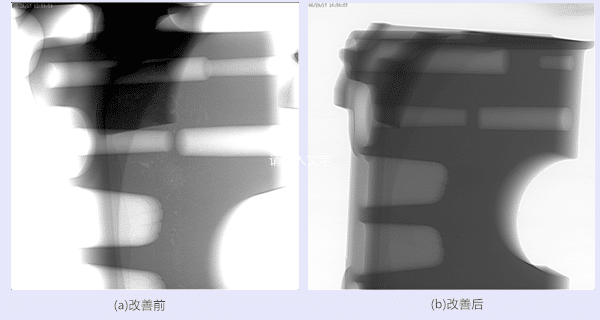
The above figure shows the X-ray inspection comparison before and after the improvement of the casting shrinkage area. It can be seen that the casting shrinkage holes appear near the bearing holes, which are widely distributed and scattered, and the organization is relatively loose, because the bearing holes of the cylinder block need to be passed to the pressure lubricating oil, so there is a risk of oil leakage during the service period of the casting; after the improvement, the loose distribution of shrinkage holes can no longer be seen on the X-ray inspection photos, and the internal organization of the casting appears to be more dense.
結論
- Shrinkage hole is a common internal defect of casting, which is easy to appear in the area of larger wall thickness and higher mold temperature. It usually starts from several aspects such as mold design (pouring system, cooling system), process parameter setting and casting condition guarantee. For the wall thickness involved in larger castings, the traditional improvement measures can only play a role in alleviating the role, but not completely solve the problem.
- Imitated the punch in the pressurization stage of the complementary contraction role designed two extrusion pin, the shrinkage hole region to play a second pressurized complementary contraction role, the effect is more obvious.


