Research on shrinkage cavities in aluminum die castings and strategies to reduce the scrap rate from 5% to 0.2% was conducted. Shrinkage cavities, common internal defects in aluminum alloy die-casting parts, often occur in areas with large wall thickness or hot spots. While generally acceptable if they don’t impact product performance, certain critical parts, such as cooling water or lubricating oil passages in automobile engine cylinder blocks, must be free of shrinkage holes.
Shrinkage cavities are common internal defects in aluminum alloy die-casting parts. They often appear in locations where the wall thickness of the product is relatively large or where hot spots are prone to form. Generally speaking, as long as shrinkage cavities do not affect the performance of the product, they will be judged as qualified. However, for some important parts, such as the cooling water passage holes or lubricating oil passage holes of the automobile engine cylinder block, the occurrence of shrinkage holes is not allowed to be judged as qualified.
An aluminum alloy engine crankcase from a certain company is cast using a Bühler 28 000 kN cold chamber die-casting machine and is made of ADC12 alloy. The mass of the casting blank is 6.3 kg. During the X-ray inspection in the post-process, it was found that shrinkage holes appeared in the oil passage of the second crankshaft bearing hole, which was about 8 mm away from the oil passage, and there was a large risk of oil leakage. According to statistics, the scrap rate of shrinkage cavities at this location in 2017 was 5%. After a series of explorations, the scrap rate was successfully reduced to 0.2%.
Mechanism and morphology of shrinkage cavities in aluminum alloy die castings
Shrinkage cavity formation mechanism
There are many reasons for shrinkage cavities in aluminum alloy die castings. Tracing back to its origin, it is mainly caused by insufficient feeding of the aluminum liquid during the transition from the liquid phase to the solid phase of the aluminum alloy. Common causes of shrinkage include:
- The mold temperature gradient is unreasonable, resulting in inconsistent local shrinkage of aluminum liquid.
- The pouring amount of aluminum liquid is too small, resulting in a thin material cake and insufficient pressure compensation during the boosting stage.
- The mold has hot knots or sharp areas.
- The inner gate of the mold is not wide enough and has a small area, which causes the casting to solidify prematurely, hinders pressure transmission during the pressurization stage, and prevents the aluminum liquid from being fed.
- If the casting pressure is set too low, the feeding effect will be poor.
Casting shrinkage cavity morphology
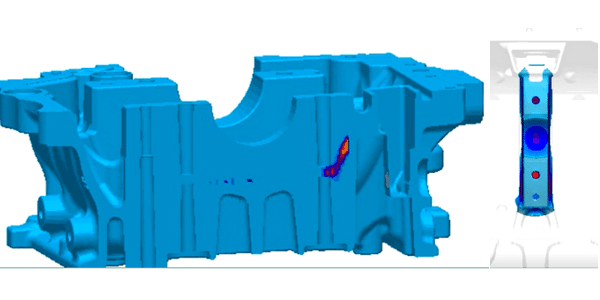
Shrinkage cavities are a common internal defect in aluminum alloy die-casting parts and even castings. They often appear in areas with large wall thickness, sharp corners of the mold, and large mold temperature differences. Figure 2 shows the shape of the shrinkage hole in the crankcase of a certain engine. The shrinkage hole is oval-shaped, about 10 mm from the bearing oil passage hole, and the inner wall is rough and dull. The wall thickness of the casting in the shrinkage cavity area is relatively large, about 22 mm; there is no cooling water at the front end of the oil passage hole pin, and the mold temperature is relatively high. The two major journals of the automobile engine crankshaft (main journal and connecting rod journal) have a large working load and serious wear, so pressure lubrication must be carried out during operation. In this case, if there are shrinkage holes near the oil passage hole of the journal, it will seriously affect the lubrication effect.
Measures related to shrinkage cavities
The reasons for casting defects in aluminum alloy die-casting parts include the structural characteristics of the product itself, unreasonable mold design, unreasonable design of the gating system and cooling system, and unreasonable design of process parameters. Based on the common causes of casting defects and the processing procedures for aluminum alloy casting defects, we explore corresponding countermeasures to solve shrinkage cavities in thick and large parts of aluminum alloy die castings.
Early analysis and countermeasures
The preliminary analysis of shrinkage cavities in castings starts with easy-to-operate process parameters. Through on-site measurement and observation, the measured inner gate thickness of the mold is 4 mm, the calculated inner gate speed is 40 m/s, and the thinnest part of the product wall thickness is 4.6 mm; material cake thickness is 25 mm; casting pressure is 60 MPa. It is known from experience that if the mold design conforms to the structural characteristics of the product, the mold gating system should not have the problem of insufficient feeding during the pressurization stage. However, the aluminum liquid feeding in the pressurization stage is directly related to the material cake thickness and the pressurization pressure. Only suitable material cake thickness and casting pressure can form castings with dense internal structures. Therefore, it can be suspected that shrinkage cavities are caused by casting pressure deviation. Caused by low and thin dough.
There are two early strategies to eliminate shrinkage cavities in castings:
- The casting pressure was increased from the previous 65MPa to 90 MPa.
- The thickness of the cake is adjusted from the original 25 mm to 30 mm. After adopting the above measures, the shrinkage rate was reduced from 5% to 4.8% after small-batch special flow verification. The effect was not obvious, indicating that process parameters are not the main cause of shrinkage in castings.
Interim Analysis and Countermeasures
Since the essential cause of shrinkage cavities in castings is insufficient feeding during the solidification of molten aluminum, uneven temperature distribution in the mold can easily lead to unreasonable solidification sequence of molten aluminum, resulting in insufficient feeding. Therefore, the mid-term countermeasure analysis mainly focuses on ensuring a reasonable mold. Begin with the temperature. It can be seen from the product 3D model that the wall thickness of the shrinkage cavity of the casting is 22.6mm. The larger wall thickness can easily cause a higher mold temperature. When the aluminum liquid solidifies, the aluminum liquid inside the casting with a large wall thickness is still in the liquid phase or the solid-liquid mixed phase due to the high temperature, and at this time, the feeding channel of the inner gate may have solidified. In this way, the casting cannot be fed with molten aluminum during the pressurization stage, which may lead to the formation of shrinkage cavities. In order to ensure the appropriate mold temperature, a thermal imager was used to measure the maximum mold temperature after spraying the release agent to be 272°C, which is higher than the normal mold temperature after spraying. The mold temperature and distribution in other areas are generally normal. Therefore, it is necessary to reduce the mold temperature in the shrinkage cavity. In addition, it is measured that the distance between the bottom of the cooling water hole and the surface of the mold cavity is 20 mm. Because a larger heat transfer distance will reduce the cooling effect of the mold, the cooling water hole needs to be changed.
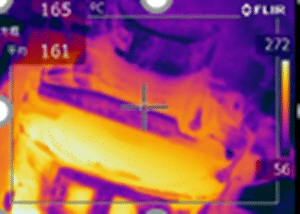
In order to reduce the temperature of the mold at the shrinkage cavity, three main methods are adopted:
- Improve the mold cooling system. Deepen the depth of the cooling water hole of the shrinkage cavity attachment from 20 mm to 12 mm from the mold surface, so as to quickly take away the heat of the nearby mold and reduce the mold temperature; number all the mold cooling water pipes and water pipes in a unified manner, corresponding one to one to prevent There is a mistake in mold preservation, which affects the cooling effect.
- Lower the pouring temperature from 675 °C to 645 °C.
- Extend the spraying time of the mold at the shrinkage cavity from 2 s to 3 s. After the above rectification measures were implemented, the temperature of the mold in the shrinkage cavity area dropped significantly after spraying, to about 200°C, which was within the normal range. The shrinkage rate was reduced from 4.8% to 4%, indicating that such measures have a certain effect on shrinkage, but they cannot completely solve the shrinkage problem in this area.
Later analysis and countermeasures
Through the previous two improvements, it is basically guaranteed that the die-casting mold is in a theoretically reasonable state; that is, the pouring system is reasonably designed, the cooling system is properly arranged, and the process parameter design is optimal. However, the shrinkage rate of castings is still as much as 4%. The wall thickness of the casting shrinkage cavity is 22.6 mm, which is much larger than the wall thickness of other parts. The larger wall thickness may cause insufficient feeding during solidification in the center of the casting. After the pressurization is completed, this area has not yet completely solidified and continues to shrink to produce shrinkage cavities. Therefore, how to solve the problem of insufficient feeding in the shrinkage cavity of castings may be the key to the problem. Generally speaking, the feeding of castings is carried out through the path of cake → sprue → ingate → casting. Since the thick part of the casting solidifies at the inner gate, the feeding channel in the later stage of pressurization is cut off, so feeding cannot be done.
In view of the conventional pressurization stage, the injection punch applies casting pressure through the material cake to achieve the feeding effect. The measure taken is to add a slag bag-like structure near the shrinkage hole of the casting to act as the material cake and use a pair of oil cylinder core-pulling mechanisms to act as punching First, in the late solidification stage of the casting, secondary pressurization and feeding are performed on the areas prone to shrinkage cavities to achieve the purpose of eliminating shrinkage cavities. Generally speaking, such a secondary pressurization mechanism is called an extrusion pin. Its pressurization principle is to apply appropriate pressure after the molten metal or alloy liquid is poured and before it is completely solidified to enhance the solidification and feeding effect of the casting and improve the casting quality. Density: reduce or eliminate shrinkage cavities. Pressurized solidification can change the physical parameters and crystallization process of metals and their alloys, change the distribution and size of loose voids, increase the density of castings, and improve the tensile strength, hardness, and other properties of castings.
According to the law of casting feeding and pressurization, the extrusion pin action signal adopts the pressurization signal of the casting process and is delayed as the start signal on this basis. Therefore, the extrusion pin mainly controls the two parameters of extrusion depth and extrusion delay time. . The extrusion depth depends on the casting structure and the distribution and size of shrinkage holes, generally 10~20 mm; the extrusion delay mainly refers to the pressurization time setting, usually 2~5 s. In actual engineering, the determination of extrusion parameters is based on empirical values and then optimized according to the casting situation. In order to easily adjust the extrusion parameters, a separate oil cylinder is usually used to control the extrusion pin action.
For crankcase castings, the later improvement measures were to arrange two extrusion pins symmetrically near the mold bearing holes, and optimize the secondary pressurization of the extrusion pins by adjusting the two main parameters of extrusion depth and extrusion delay. The effect is to reduce the shrinkage porosity of castings. On the basis of the aforementioned measures, after two additional extrusion pins were added to the mold, the shrinkage rate dropped significantly, and the defective rate dropped from 4% to 0.2%. At the same time, among the defective products with 0.2% shrinkage cavities, the size of the shrinkage cavities is significantly reduced. Therefore, the extrusion pin solution plays a better role in controlling the shrinkage rate of castings with increased wall thickness. However, during this improvement process, the shrinkage cavity defect rate of castings also experienced fluctuations. By optimizing the extrusion parameters—the extrusion depth is 15 mm, the extrusion delay time is 2.5 s, and the specified extrusion pin service life (times/8000 molds) and other relevant specifications—the casting defect rate has been stabilized at around 0.2%.
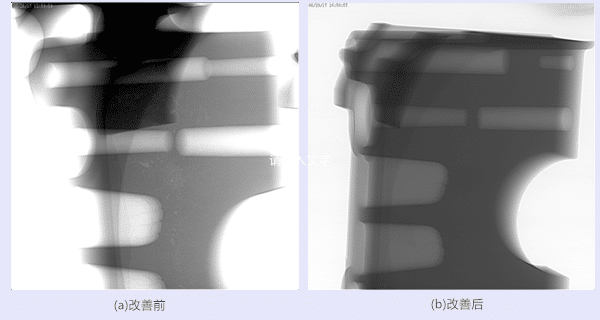
X-ray flaw detection
Comparative photos of X-ray flaw detection before and after improvement of the shrinkage cavity area of the casting It can be seen that shrinkage holes in the castings appear near the bearing holes, are widely distributed and scattered, and the structure is relatively loose. Since the bearing holes in the cylinder block need to be filled with pressure-lubricating oil, there is a risk of oil leakage in the castings during use. After improvement, from The loose distribution of shrinkage cavities can no longer be seen in the X-ray inspection photos, and the internal structure of the casting appears denser.
tot besluit
- Shrinkage cavities are a common internal defect of castings and tend to appear in areas with a larger wall thickness and a higher mold temperature. Usually starting from several aspects such as mold design (pouring system, cooling system), process parameter setting, and casting condition guarantee For the castings with larger wall thicknesses involved, traditional improvement measures can only alleviate the problem but cannot completely solve it.
- Two extrusion pins are designed to imitate the feeding effect of the punch during the pressurization stage, which plays a secondary pressurizing and tightening effect on the shrinkage hole area, and the effect is obvious.


